










How to Operate a Mini Excavator: Controls, Techniques & Safety
2026-06-28
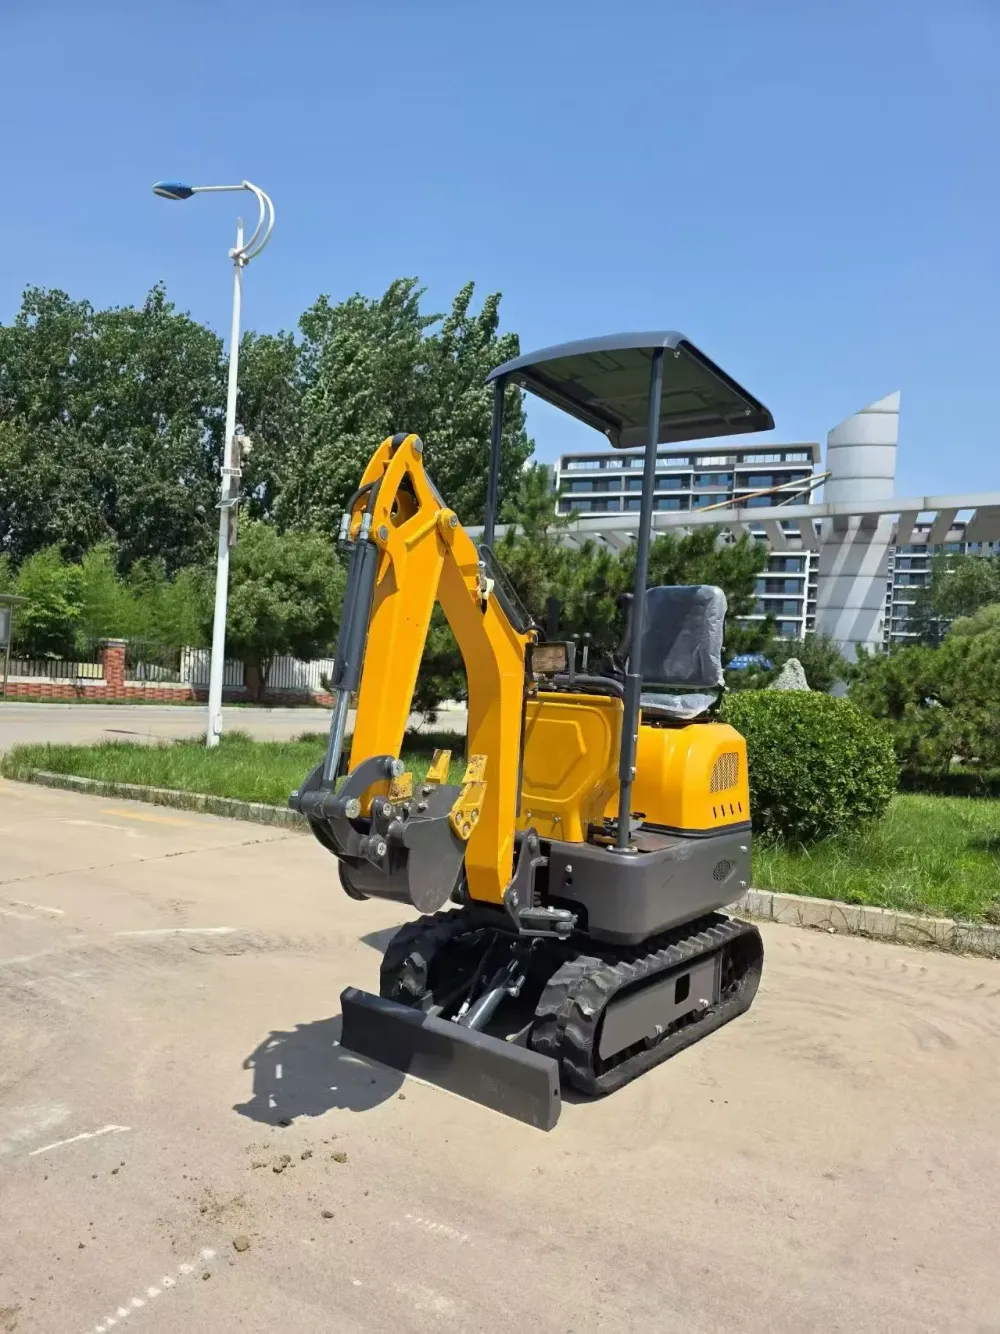
A practical step-by-step guide to operating a mini excavator safely — covering cabin controls, swing and travel, basic digging technique, and what a micro digger driver needs to know before the first shift.
Operating a mini excavator for the first time is less complicated than it looks, but the controls are not intuitive until you understand the logic behind them. Both joysticks control two functions each, travel levers move the machine, and the foot pedals run auxiliary attachments — layer those three systems and the cab makes sense. Get the logic wrong and you'll spin the upper structure when you meant to curl the bucket, or creep forward when you meant to slew. This guide walks through the controls, the basic digging cycle, travel technique, and the safety steps that protect both the operator and everyone nearby.
We build the ZHONGMAI mini excavator range to ISO control standards, so everything below applies directly to our machines and transfers to any standard-pattern compact excavator.
Pre-operation: walkaround and cabin checks
A micro digger driver who skips the walkaround is the one who finds a hydraulic leak at the bottom of a trench. Before you start:
- Walk around the machine and check for fluid leaks under the engine, hydraulic pump, and swing bearing.
- Check engine oil, coolant, and hydraulic fluid levels with the machine on level ground.
- Inspect track tension — a loose track derails; an over-tightened track wears fast. Most mini excavators have a grease-fed tensioner accessed through the undercarriage side panel.
- Check the bucket pin and coupler — if a quick coupler is fitted, confirm the locking pins are seated before you lift anything.
- Adjust the seat and mirrors before closing the cab door. If you can't comfortably reach both joysticks with your back against the seat, adjust before you start, not after.
Once inside: fasten the lap bar or seatbelt (whichever the machine uses), confirm the travel speed selector is in low, and check that all control levers are in neutral before turning the key.
Understanding the joystick controls
Standard ISO/SAE pattern mini excavators use two joysticks. The left joystick controls swing (left/right) and arm (in/out). The right joystick controls boom (up/down) and bucket (curl/dump). That pattern is consistent across nearly all modern compact excavators and applies to every ZHONGMAI mini excavator we ship.
Some older machines and certain North American models use an alternative pattern (John Deere or "H" pattern) where boom and swing are split differently. If you sit in an unfamiliar machine, always check the control decal inside the cab before moving any lever.
A useful way to internalize the pattern: the left stick controls the arm — think of it as your elbow joint (arm in and out) and your waist (swing left and right). The right stick controls reach — think of it as your shoulder (boom up and down) and your wrist (bucket curl and dump). Once you map it to your own body, the inputs become muscle memory quickly.
Basic digging cycle
Every excavating pass follows the same four-step cycle. Learn this cycle and you can dig a trench, a footing, or a level pad without being shown twice.
- Position the boom: raise the boom so the bucket clears the ground, swing to the dig zone, and lower until the cutting edge sits at the start of your cut.
- Curl the bucket into the material: crowd the arm in (pull the left stick toward you) while simultaneously curling the bucket (pull the right stick toward you). Coordinate both inputs — arm speed and bucket curl speed should finish at roughly the same time.
- Raise and swing to the dump zone: once the bucket is full and curled, raise the boom slightly, then swing the upper structure to the spoil pile or truck. Keep the bucket curled during the swing to avoid spillage.
- Dump and return: dump the bucket (push the right stick away from you), then swing back and lower the boom to start the next pass.
New operators typically over-control — large stick inputs produce jerky cuts. Practice with small, deliberate inputs until the machine moves smoothly. Smooth operation is faster and gentler on the hydraulics than hard, full-travel stick movements.
Travel and positioning
Driving a mini excavator — moving it on tracks — is controlled by the two travel levers or foot pedals at the base of the cab, depending on the model. Push both forward and the machine travels forward; pull both back and it reverses. Push one forward and hold the other to turn. Full differential on one side and the machine spins on its axis.
The critical thing to know before you travel: the travel direction depends on which way the sprocket (the drive wheel) is facing. On most mini excavators the sprocket is at the rear. If you're seated in the cab facing the bucket, the sprocket is behind you — push the travel levers forward and the machine moves forward relative to you and the bucket. If you've swung the upper structure 180 degrees and the sprocket is now at the front, pushing the levers will move the machine in the opposite direction to what you expect. Always check sprocket position before traveling.
For driving a mini digger on a slope, point the heavy end — the counterweight — uphill. This keeps the center of gravity on the safe side of the tipping line. Avoid swinging a loaded bucket when you're on a slope. If the ground is soft, check that the blade is in contact with the ground before you dig — the blade acts as a stabilizer and stops the machine from walking back during hard pulls.
Working with a micro digger with driver: site communication
On sites where a micro digger with driver is hired in — rather than operated by the site crew — clear communication between the operator and the people on the ground is critical. The operator has a restricted field of view on all four sides, and the swing radius of the upper structure can be much larger than bystanders expect.
Establish ground rules before the machine moves: one designated spotter, hand signals agreed in advance (stop, direction, depth), and a rule that nobody enters the swing arc without the operator's knowledge. On confined sites — inside buildings, tight residential gardens, between existing services — the spotter is not optional. The machine can swing and strike in less than a second at full hydraulic speed.
For mini excavator hire situations where the operator is experienced but unfamiliar with the site, a five-minute walk of the site boundary, service locations, and access route before the machine starts is time well spent.
Grading and finishing
Digging is the easy part. Grading to a level or a finished slope takes more control. The technique is to work with a nearly empty bucket — dump most of the material and use the residual weight of the bucket, not the curl, to feather the surface. Lower the boom slowly with the arm extended and let the bucket back drag across the surface. Small boom inputs at slow speed produce a flat, consistent result. Large inputs produce scalloped ground that needs another pass.
For level work, use a reference string line or laser level and set the blade as a guide. The blade on a mini excavator is not just for pushing spoil — set it level and use it as your depth datum. Lower the bucket to the blade surface to check your dig depth without measuring every time.
On finished surfaces — driveways, turf, paving — fit rubber track pads if steel tracks are the only option, and keep the blade clear of the surface during travel. The blade corners on a steel blade will mark finished concrete on a turn.
Safety rules that matter
Most mini excavator incidents fall into a small number of categories. These are the rules that prevent the majority of them:
- Know what's underground before you dig. Call your local dial-before-you-dig service and confirm service locations. A mini excavator bucket through a gas line or high-voltage cable is a fatality-level event. Mark services on the ground before the machine starts.
- Respect the lift chart. Every mini excavator has a rated lift capacity at a given radius. Exceeding it doesn't just tip the machine — it can fail the boom pins or bucket linkage under dynamic load. The lift chart is typically on a sticker inside the cab.
- Never swing a loaded bucket over people. Not bystanders, not the site crew, not anyone. This is non-negotiable.
- Lower the attachment to the ground before leaving the machine. An arm left raised is a stored energy hazard to anyone who accidentally bumps a control.
- On slopes, use the blade. Drop the blade into the ground on the downhill side when working on any grade steeper than you're comfortable with.
For formal training, most regions have a compact plant operator certification — it's worth doing before site work, and many sites require it. But the core technique — learning the controls in a flat open area before moving to confined or sloped ground — is where every operator should start.
Browse our operating a mini excavator range · — we reply within one business day.
Frequently asked questions
How long does it take to learn to operate a mini excavator?
Most people can complete basic digging cycles and travel safely within a few hours of seat time in an open, flat area. Proficiency at grading, working on slopes, and in confined spaces typically takes a few days of supervised practice. Formal compact plant operator certification courses run one to two days and are accepted on most commercial sites.
What is the difference between ISO and SAE joystick patterns on a mini excavator?
ISO pattern (used on most modern machines worldwide): left joystick controls arm in/out and swing left/right; right joystick controls boom up/down and bucket curl/dump. SAE or H pattern (common on older North American machines): boom and swing are split differently. Always check the control decal in the cab before operating an unfamiliar machine.
How do you travel a mini excavator safely on a slope?
Point the counterweight end uphill before ascending or descending. Keep the bucket low and close to the ground. Avoid swinging a loaded bucket on any grade. Use the dozer blade on the downhill side as a brake if the machine begins to slip. Never travel across the face of a steep slope — always go straight up or straight down.
Can you drive a mini excavator on a road or public footpath?
In most jurisdictions, mini excavators are not road-legal and must be transported on a trailer between sites. On private ground or within a managed site perimeter, travel on tracks is normal. Rubber tracks are required on finished surfaces to avoid damage. Check local regulations if you need to cross a public road — a permit or escort is usually required.
What does a micro digger driver need to check before starting work each day?
Daily checks before starting: engine oil, coolant, and hydraulic fluid levels; fuel; track tension and condition; bucket pin and coupler locking pins; hydraulic hoses for leaks or chafing; and a visual check under the machine for overnight leaks. This walkaround takes about five minutes and catches most issues before they become failures on the job.
How do you grade a flat surface with a mini excavator?
Use a nearly empty bucket in back-drag mode — lower the boom with the arm extended and drag the bucket back across the surface with light downward pressure from the boom. Work in overlapping passes and use a string line or laser level as a datum. The dozer blade set at target depth is a useful on-machine reference point.
What is the maximum lift capacity of a mini excavator?
Lift capacity varies by model and reach distance — it is always lower at extended reach than at close radius. The rated lift chart is posted inside the cab and should be consulted before any lift. As a general guide, a 1.5 ton mini excavator might lift 400–600 kg at close radius; a 3.5 ton machine might lift 1,000–1,500 kg. Never estimate — use the chart.
Related articles
How to Drive and Operate a Skid Steer Loader: A Beginner's Guide
A complete beginner's guide to driving a skid steer loader — covering pre-operation checks, how the controls work, driving on varied terrain, digging techniques, attachment use, safety rules, and an honest look at why building your own skid steer rarely makes sense.
Read more →
Largest Digger in the World — And What Most Buyers Actually Need
From the Bagger 293 bucket-wheel to the Cat 6090 mining giant, the world's largest diggers are engineering spectacles — but they have nothing to do with what most buyers actually need. Here's the full story, from record-breaking monsters to the compact machines that get real work done.
Read more →
Reach Truck Operator: Skills, Training, and What the Job Actually Involves
A complete guide to the reach truck operator role: what you do on the job every day, the skills and certification you need, safety rules that matter, and how the right machine makes every shift easier.
Read more →